
Erin Hallett, Beauty Editor.
You’re sitting under the salon lamp for the third time this month because the gel on your right thumb lifted at the edge again, and you’re wondering whether it’s your nails, the product, or the person holding the file. Most people never find out. They just switch salons, switch brands, or give up on gel altogether and go back to regular polish that chips in two days instead of two weeks.
Here’s the practical fact that changes how you look at the whole process: a gel manicure’s lifespan is decided in the first four minutes, before a single coat of colour goes on. The prep work, not the polish brand, is what most nail technicians and product chemists check first when something goes wrong. Once you know what they’re actually looking at, you can judge a salon, a home kit, or your own technique in about the time it takes to file one nail.
- Prep decides more than product: how the nail plate is cleaned and buffed before colour goes on affects wear time more than which gel brand is used.
- Cure time is not optional: under-curing by even 10 seconds per coat is the single most common cause of early lifting and soft, dented gel.
- Thickness is the enemy of durability: the thinnest possible coats, applied in more layers, outlast one thick coat every time.
Why The Nail Plate Matters More Than The Polish
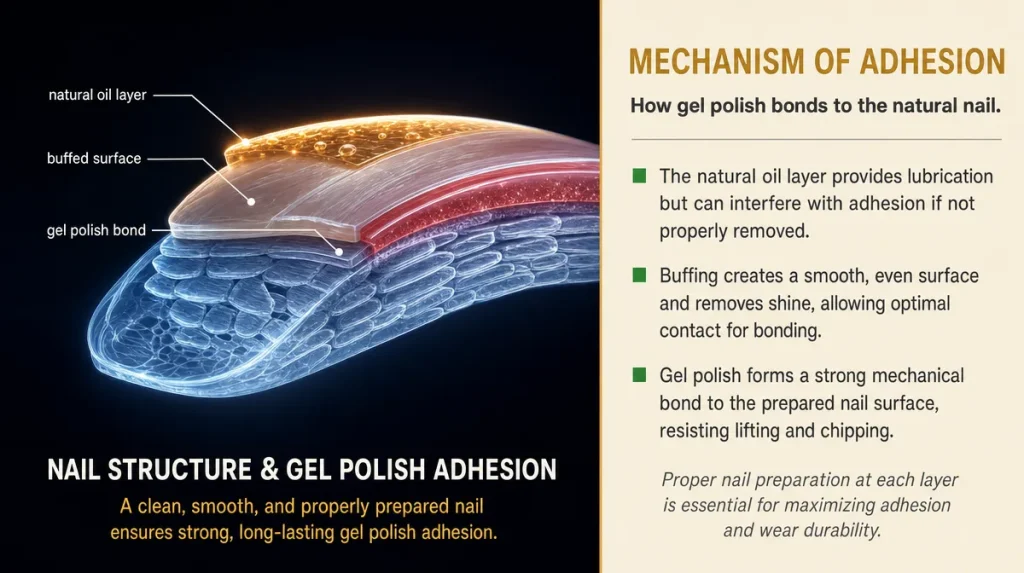
Think of your natural nail as a stack of very thin roof shingles, layered flat and slightly overlapping. Gel polish is designed to grip onto the surface of that stack, not soak into it. If the top shingles are coated in natural oil, or if the surface is glossy and unbroken, the gel has nothing to hold onto, no matter how good the formula is.
This is why a technician (or a careful home user) spends the first few minutes pushing back cuticles, lightly buffing the shine off the nail surface, and wiping with an alcohol-based cleanser before any colour touches the nail. A 2021 study in the International Journal of Cosmetic Science tracking gel adhesion found that mechanical buffing of the nail plate, combined with a dehydrating wipe, extended wear time by several days compared with polish applied straight onto an unprepped, oily nail.
The mistake most people make at home is skipping the buff step because the nail already looks smooth and shiny. Smooth and shiny is exactly the problem: gel needs a very slight texture to grip, the same way paint holds better on a lightly sanded wall than on gloss.
Self-test: run a fingertip lightly across a freshly buffed nail before polish goes on. It should feel faintly matte, almost chalky, never glassy.
Reading A Cure Lamp Correctly
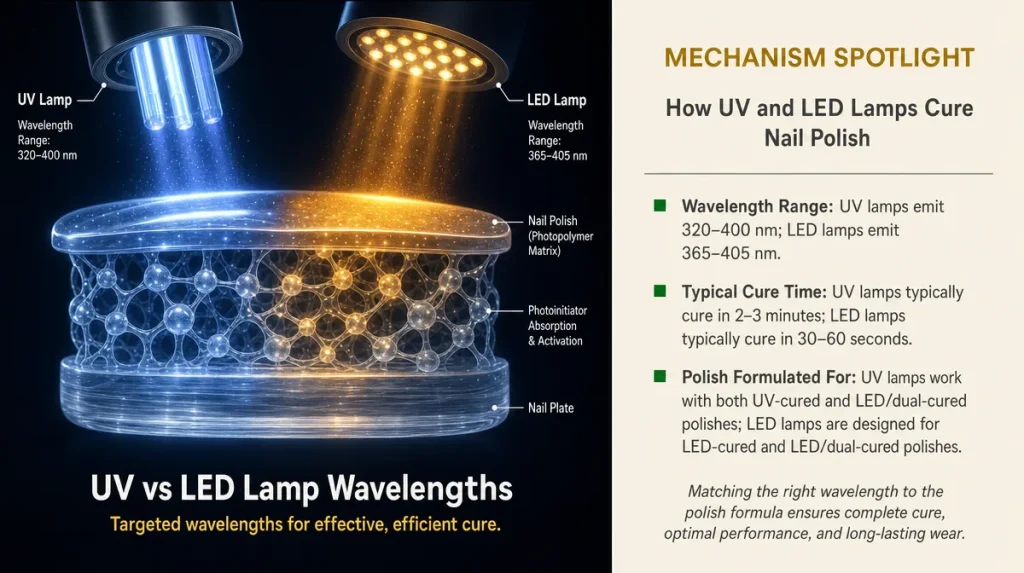
Curing is the step where liquid gel becomes a hard, wearable surface, using either UV or LED light to trigger a chemical reaction in the polish. It sounds technical but the practical test is simple: gel that has cured properly is uniformly hard, slightly warm immediately after curing, and shows no tacky residue when wiped.
Every gel brand specifies a cure time for its lamp wattage, usually printed on the bottle or in the salon’s equipment manual. Nail technicians who under-cure, often to save time between clients, produce a coat that looks finished but stays chemically soft underneath. That softness is what causes gel to dent under light pressure or peel away in one piece within days rather than weeks.
A mismatch between lamp and polish is just as common as rushing the timer. LED lamps and UV lamps cure at different wavelengths, and a gel formulated for one may under-cure badly in the other. This is a genuine, verifiable shortcut some cheaper kits take: pairing a low-wattage generic lamp with a gel that needs a stronger cure, because the lamp is the cheaper component to skimp on.
Self-test: after curing, press a fingernail firmly against the freshly finished nail. Properly cured gel will not dent, mark, or feel sticky. Any softness is a sign the cure was too short or the lamp too weak.
Why Thin Coats Outlast Thick Ones
It feels intuitive that more product means more protection, the same way a thick coat of paint feels sturdier than a thin one. With gel, the opposite is true. Thick gel doesn’t cure evenly all the way through: the surface hardens under the lamp while the layer underneath stays slightly soft, creating a weak point that shows up later as cracking or lifting from the edges inward.
Experienced technicians apply gel in the thinnest layer that still gives even colour, then repeat for a second or third coat rather than trying to get full opacity in one pass. Each thin layer cures fully through its depth, so the finished manicure is a stack of fully hardened layers rather than one half-cured slab.
The mistake home users make most often is loading the brush too generously to avoid streaky colour. The fix isn’t a better brush technique so much as patience: two thin coats, each fully cured, will always outlast one thick coat, even if the thick one looks more even straight off the brush.
What matters here is coat thickness and full cure, not the price of the polish. A premium bottle applied thickly will fail the same way a budget one does.
The Edge Test: How Technicians Check The Free Edge
Lifting almost always starts at the free edge, the exposed tip of the nail beyond the fingertip, because that’s the part most exposed to water, friction, and knocks. A detail many home users miss: gel needs to be capped over this edge, meaning the brush sweeps a thin line of polish over the very tip of the nail, sealing it rather than stopping just short.
Without capping, water and soap work their way under the polish from the tip inward, lifting it away from the nail bed over days. This is one of the most reliable predictors of how long a manicure will last, and it takes seconds to check.
Self-test: hold your hand at eye level and look at the very tip of each nail from the side. You should see a thin, even line of colour wrapping over the edge, not a hard stop where polish meets bare nail. If the tip is bare, that nail will likely be the first to lift.
What Realistic Wear Actually Looks Like
Most gel manicures, done well, hold their finish for two to three weeks before natural nail growth makes the base visible and the colour starts to look dated rather than damaged. That’s a normal result, not a failure of the product.
Signs of an actual problem, rather than ordinary wear, include lifting at the edges within the first three to five days, a soft or dented surface that never fully hardened, or colour that looks patchy from the very first day. Any of these point back to prep, cure time, or coat thickness rather than the brand of polish used.
It helps to separate two different things: the gel lasting (staying stuck to the nail) and the gel looking fresh (no regrowth line). The first is a technique and product-application issue. The second is simply biology, since nails grow at an average of roughly three millimetres a month, and no gel formula changes that rate.
Removal: The Step That Decides Your Next Manicure
How gel comes off affects how healthy your nail plate is for the next set, and this is where a lot of at-home damage happens. Peeling gel off, rather than soaking and gently lifting it, pulls away layers of the nail’s own surface along with it, leaving nails thin, rough, and more prone to peeling on their own.
The recommended method, consistent with general guidance from consumer and dermatology bodies on nail care, is to gently file the top shiny seal coat, wrap the nail in acetone-soaked cotton, cover with foil, and leave for ten to fifteen minutes before gently sliding the softened gel off with a wooden or metal cuticle stick, never scraping or prying.
A nail that has been peeled rather than soaked will often look ridged or patchy for several weeks afterwards. This is one of the more common, and entirely avoidable, causes of nails looking damaged after gel, and it has nothing to do with which polish was used.
Marketing Claims Worth Ignoring Versus Details Worth Checking
Bottles and salon menus are full of language like “7-day wear guaranteed” or “strengthening formula”, and it’s worth knowing which claims are genuinely useful and which are simply marketing polish of their own.
Wear-time guarantees printed on a bottle depend entirely on prep, cure, and application, as covered above, so they describe a best-case scenario under ideal conditions rather than a promise. “Strengthening” or “vitamin-enriched” formulas may offer a marginal benefit to the nail surface, but the difference between a gel manicure lasting ten days or three weeks has far more to do with technique than any additive in the bottle.
What is actually worth checking: whether the salon or kit specifies a cure time matched to its lamp, whether application is visibly thin and even, and whether the free edge is capped. These are details you can verify with your own eyes in under a minute, unlike ingredient claims on a label.
Key Takeaways
A gel manicure’s durability is decided mostly before the colour goes on and mostly by technique, not brand. Nail plate prep, correct cure time matched to the lamp, thin even coats, and a properly capped free edge account for nearly all the difference between a manicure that lasts weeks and one that lifts within days. Removal technique also decides how your nails look going into the next set.
A Quick Checklist Before You Sit Down For Your Next Gel Manicure
- Ask whether the nail will be buffed and dehydrated before polish, not just pushed back at the cuticle
- Check that the cure lamp matches the gel brand’s specified wattage and time
- Watch whether coats go on thin, with two or three light layers rather than one heavy one
- Look at the free edge of the finished nail for a thin capped line of colour, not a bare tip
- At removal, ask for the soak-and-lift method, never a peel
This article is general information only and does not replace advice from a qualified nail technician or dermatologist.
Individual results vary depending on nail condition, technique, and aftercare.